Tag: Raspberry Pi
Raspberry Pi Zero: GPIO Header Options
Raspberry Pi: Attach A Sensor To Raspberry Pi and Receive Mobile Alerts
In this particular scenario, my goal was to attach a motion sensing device to Raspberry Pi Zero W and have it send me alerts. Now that this basic functionality is achieved, I can modify and reuse it as I wish.
I used the following:
Hardware:
-
Raspberry Pi Zero W
-
PIR motion sensor (EMY 5 X HC-SR501 Adjust Ir Pyroelectric Infrared PIR Motion Sensor Detector)
Software:
-
(Operating system: Debian)
-
Programming Language: Node.js
-
Communication medium: IFTTT.com
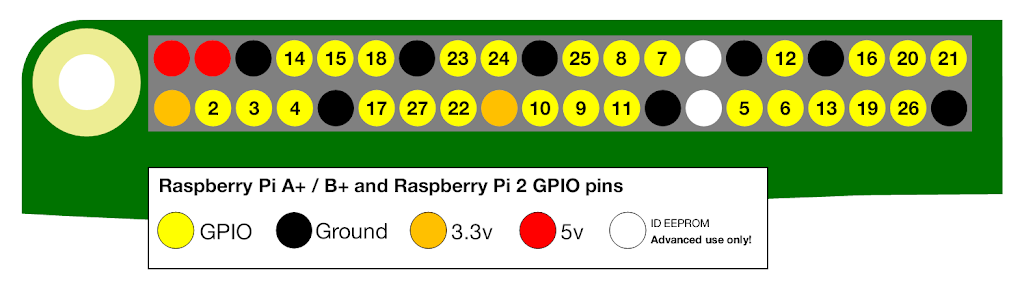
STEP ONE: ATTACHING THE PIR
This PIR component has three pins (Power, Output, Ground.) Using female-to-male cables, I attached as follows:
|
PIR PINS
|
RASPBERRY PI GPIO PINS
|
|
POWER
|
PIN 2 (5v)
|
|
OUTPUT
|
PIN 7
|
|
GROUND
|
PIN 6
|
STEP TWO:
-
If you don’t have one already, set up an account at ifttt.com . Personally, I do not recommend this site for confidential actions but it is fun to play with!
-
Navigate to “My Applets” and click on “New Applet”
-
Click the “Plus” image and you should be taken to a page “Choose a service”
-
Search for “web” and choose “Maker Webhooks”
-
Select “Receive a web request” as a trigger
-
Enter the following tag: “motion_detected” to create a trigger
-
You should be re-directed to a page that reads “If (webhook) then” Plus sign.
-
Select the “SMS” service.
-
Select “Send me an SMS”
-
Enter your tag “motion_detected” to create an action and then add the phone number for SMS
-
You should receive a special “key”. Save this.
-
Review changes and save.
STEP THREE: INSTALLING SOFTWARE ON PI:
-
Create a folder for project and ensure internet is connected.
-
Open a terminal window, type the following:
-
Test to see if Node.js is installed)
Node –v
-
If no version is returned or version is below v6, get latest:
curl -sL https://deb.nodesource.com/setup_7.x | sudo -E bash –
-
Once version is downloaded, then install:
sudo apt-get install –y nodejs
-
Test to see if latest version of Node.js is installed:
Node –v
-
Open code (pir_motion_trigger.js) in text editor. You will change the following lines of code to customize for your IFTTT applet:
// IFTTT data
var key = “enter key here”
var eventName = “motion_detected”
-
Save code and close
-
Once again, open a terminal window and navigate to your folder.
-
Type the following:
sudo node pir_motion_trigger.js
-
Wait a minute or two then wave your hand in front. Soon you should get a text message.
NOTE: This particular model of PIR has the ability to adjust sensitivity for motion delay and distance. You can manipulate by adjusting the two yellow/orange screws or programmatically.
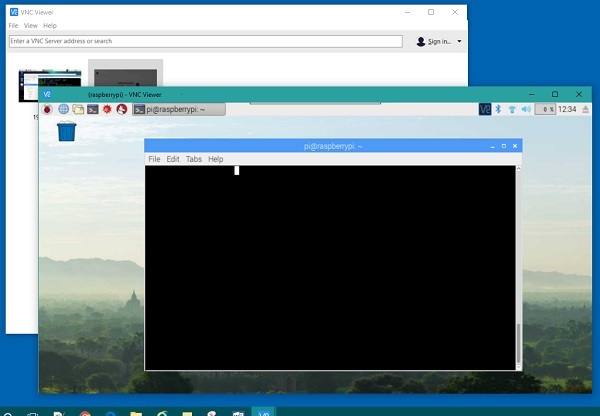
Raspberry Pi: Remotely Connect To Raspberry Pi From Windows
Remote Desktop Connection: Connecting one computer to another gaining the ability to take control of the remote computer.
The Raspberry Pi Zero can be especially difficult to program for Windows users. The tiny microcomputer runs on a Linux-based operating system. Hooking up a small computer to an external monitor is not a problem but adding keyboard or mouse can get painful without the proper resources and experience. Instead, below is what we can do.
First, an external monitor and keyboard will be needed for the initial setup. If you haven’t done this, then there is good documentation here.
Second, your main PC will need to be on the same network as your Raspberry Pi. On the Pi, you will need to get it’s IP Address. This can be done by opening the command terminal and typing “ifconfig” This should return a list of network information. Locate a line for “wlan*” and in here you will jot down the address following the entry “inet6 addr: ” It should look something like: 192.168.1.12. You will use this address to connect. Note that your Raspberry Pi will most likely want you to enter UserId and Password.
Third, follow these well-written instructions here to walkthrough the process: https://www.raspberrypi.org/documentation/remote-access/vnc/
If all works as expected, you will be able to see the desktop of your Raspberry Pi and control it from your PC.
Raspberry Pi: Super Kit 2
This is a great kit for your Raspberry Pi!
It includes breadboard, sensors, and lessons to get you going!
Technical Details:
Great improvements have been made for the SunFounder Superkit V2.0 for Raspberry Pi based on the previous version. Besides clearer Fritzing breadboard images and schematic diagrams in the manual which is much bigger than ever, code in each experiment is provided in both C and Python for users with different habits. Additionally, inside the case of the Superkit it is divided into 8 grids so you may store the components by category after the experiment is finished.
Great improvements have been made for the SunFounder Superkit V2.0 for Raspberry Pi based on the previous version. Besides clearer Fritzing breadboard images and schematic diagrams in the manual which is much bigger than ever, code in each experiment is provided in both C and Python for users with different habits. Additionally, inside the case of the Superkit it is divided into 8 grids so you may store the components by category after the experiment is finished.
15 Projects for beginners:
Lesson 1 Blinking LED
Lesson 2 Controlling an LED by a Button
Lesson 3 Flowing LED Lights
Lesson 4 Breathing LED
Lesson 5 RGB LED
Lesson 6 Buzzer
Lesson 7 How to Drive a DC Motor
Lesson 8 Rotary Encoder
Lesson 9 555 Timer
Lesson 10 Driving LEDs by 74HC595
Lesson 11 Driving 7-Segment Display by 74HC595
Lesson 12 Driving Dot-Matrix by 74HC595
Lesson 13 LCD1602
Lesson 14 ADXL345
Advanced application of Raspberry Pi – Controlling an LED Based on Web